
Settlement API Integration guide
Introduction
For all Web and iOS User Guide information see Atlas user guides.
There are currently 4 core settlement workflows supported under Atlas and Atlas Plus
| Settlement workflow | Atlas | Atlas Plus |
|---|---|---|
| Withdrawal to trusted counterparty | Yes | Yes |
| Send funds (one-way) | Yes | Yes |
| Receive funds (one-way) | Yes | Yes |
| Send and receive (two-way) | No | Yes |
USD Support on Atlas
- USD is supported across all Atlas settlement workflows (UI & API)
- USD is treated as another asset within a wallet for the purposes of settlement
- No network fees apply for USD settlement legs
Prerequisites and user guides
Please refer to our Atlas User Guide sections for more information regarding set up and prerequisites:
-
Create an API Key + Shared API Key (Atlas)
-
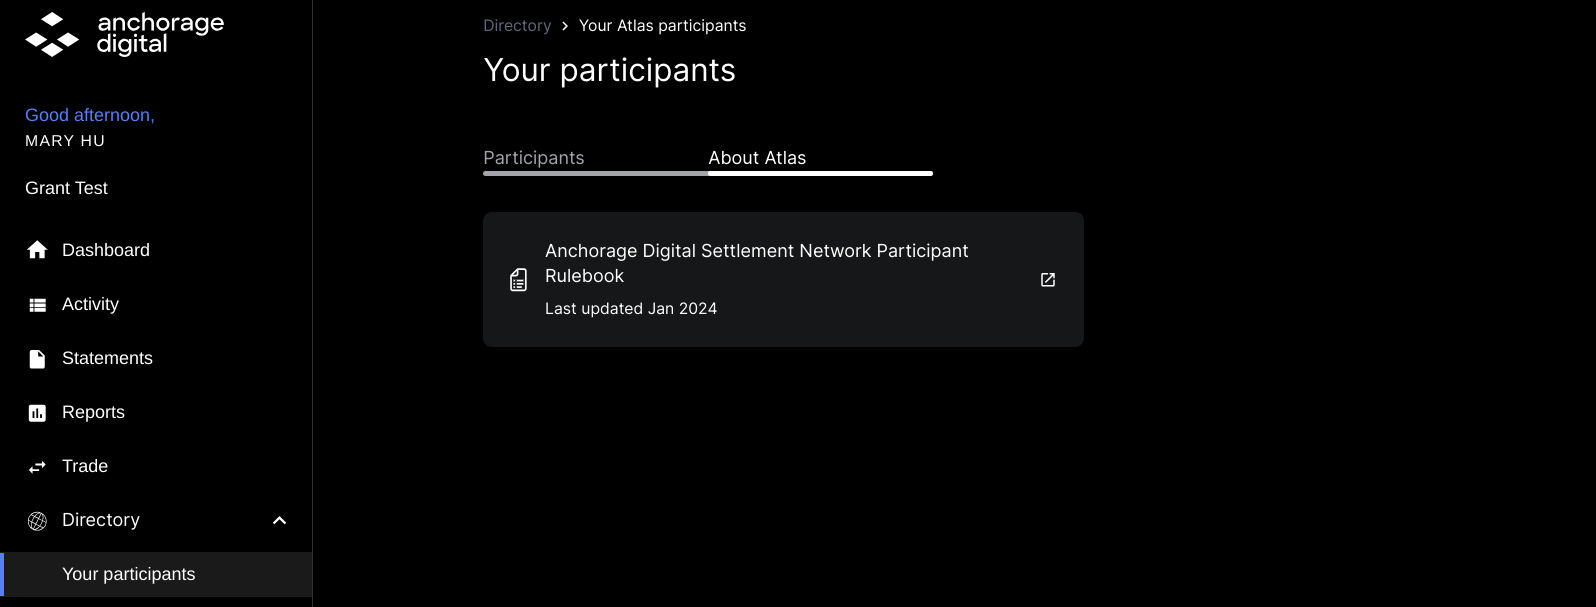
Atlas rulebook (see below)
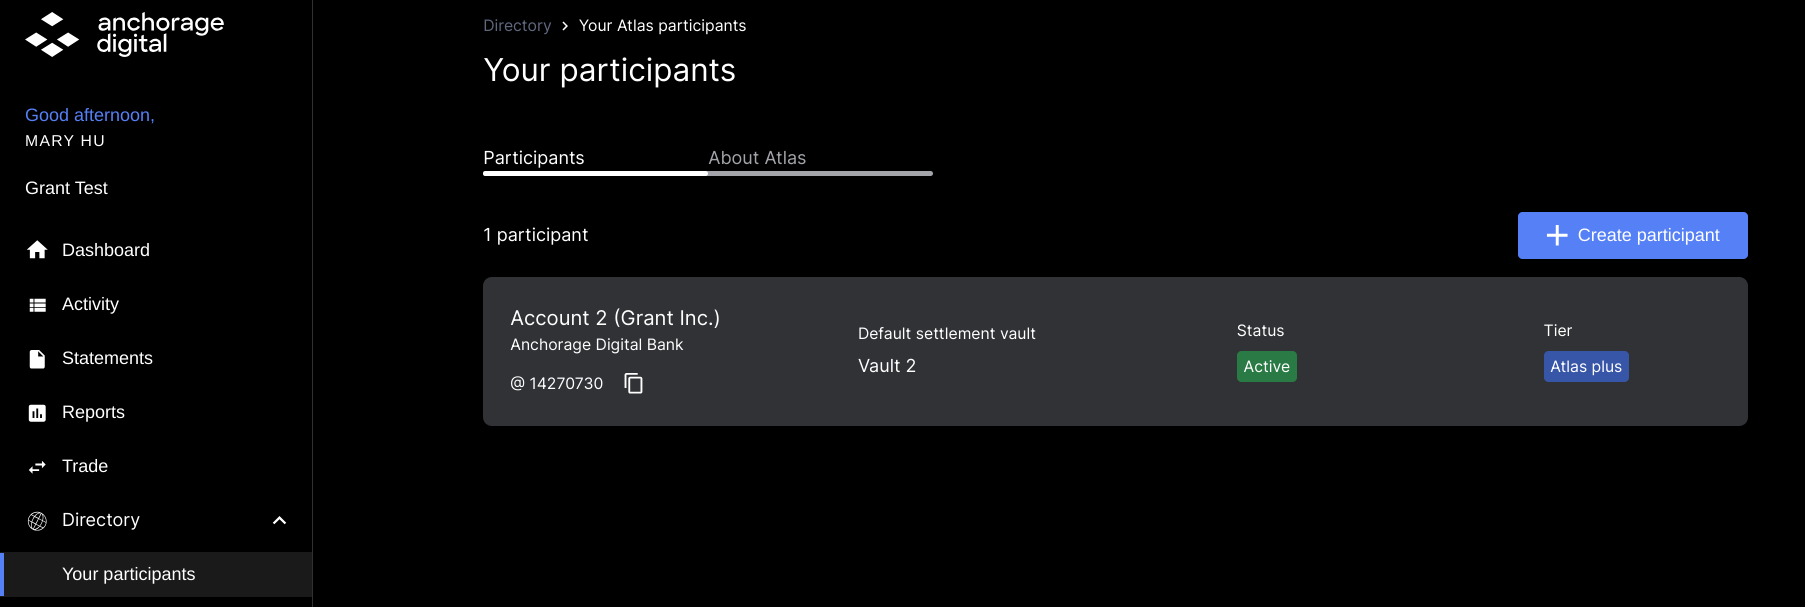
- See your web dashboard - Directory -> Your participants -> About Atlas
Atlas endpoints
| Endpoint | Required permissions | Overview | Notes |
|---|---|---|---|
| Propose a settlement | Propose and accept settlements | Propose a settlement with a counterparty for a list of assets coming from and/or arriving into wallets owned by your participant. | Positive amounts indicate funds to be received and negative amounts indicate funds to be sent. |
| Authorize a settlement | Authorize settlements | After your participant has proposed a settlement or accepted a settlement proposal, the details of the settlement must be authorized. | To authorize via API, the API key must have the 'Authorize settlement' permission. Otherwise, authorization takes place in the app according to organization policy. |
| Accept a settlement | Propose and accept settlements | Accept a proposed settlement and select wallets to receive funds to and/or send funds from. | Use positive numbers to describe assets to receive and negative to send. The sum of the amounts, by asset type, must match the negative of the sum of the amounts on the proposer's side of the settlement. The special string |
| Reject a proposed settlement | Propose and accept settlements | Rejects a settlement proposed to your network participant. Proposed settlements cannot be rejected if they have already been accepted. After your participant has proposed a settlement or accepted a settlement proposal, the authorization of the settlement can be rejected, if needed. | To unauthorize a settlement via API, the API key must have the 'Authorize settlement' permission. Otherwise, rejecting the authorization takes place in the app according to organization policy. |
| List settlements | Read vault activity | Get settlements proposed by you or proposed to you. | |
| Get settlement by ID | Read vault activity | Get a single settlement by its ID. | |
| Get counterparty details by ID | Read vault activity | List details about a specific counterparty. | |
| List my trusted counterparties | Read vault activity | List all trusted counterparties. | |
| Get participant by ID | Read vault activity | Get a single participant by its ID. | |
| List participants | Read vault activity | Get the list of participants you have access to. |
Rejecting a settlementThis endpoint can be used to either:
- Cancel a pending settlement you've initiated or authorized, but is still pending some sort of client action.
- To clarify, if the settlement has been authorized by both parties and all conditions have been met, the settlement is in
ExecutingorExecutedstate and cannot be canceled.- Reject a proposed settlement from another counterparty
UsecreateWalletstring when accepting a settlement (if needed)The special string
createWalletcan be used to indicate that a new wallet should be created for this asset when accepting a settlement. This is only currently available for the 'Accept a settlement' endpoint.
Critical IDs
| ID | Details |
|---|---|
participantId | Under “Your participants,” see the list of accounts participating in the network and their corresponding participant IDs. Other counterparties will use this ID to find you and initiate a settlement with you. Note: Your participants’ name will be visible to other network participants when searching by your participant ID. If you wish to use a different name, such us your organization's name, contact your client experience manager. |
proposerId | This is the Participant ID of whoever proposed the settlement |
acceptorId | This is the Participant ID of whoever is accepting the settlement |
settlementId | The unique ID associated with each settlement, which can be used to query past settlements via API |
idempotentId | See idempotency section for more details |
clientReferenceId | This is a unique ID created by the proposing client that can be any alphanumeric string |
vaultId | The Vault ID of the sending party (use List Vaults) |
walletId | The Wallet ID of the Sending Party (use List Wallets) |
Getting started
Prior to conducting settlement via API, you will need to complete the following steps:
- Create your own API key permission group
- Create your own API key
- Create a Shared API key
- Set up and configure your participant vault in the web dashboard
- Getting wallet balance and transaction tnformation
- Collect trusted counterparty IDs for which you will be sending and/or receiving funds
1) Client API permission group
After you have successfully signed up for the Atlas settlement network, Created the shared API key and established your settlement counterparty, you will need to set up your own API permission group and API key.
General permission group user guide
Recommended API permissions:
| Permissions | Global (org-wide) permissions | Vault-level permissions |
|---|---|---|
| Required | N/A | Read Propose and Accept Settlements Authorize Settlements |
| Optional |
|
|

2. Client API Key
- See "APIs" guide for more details
- Use the permission group created above when creating the API Key
- Note: For details on generating an Ed25519 key pair
3. Set up and configure your participant vault in the web dashboard
- See "Your participants"
4. Getting wallet balance and transaction information
Prior to testing our Atlas settlement APIs, you will need to fetch your settlement wallet details to identify balance and walletId details necessary for settlement.
- List wallets or List wallet by ID: This will return all wallets accessible for this API key. This can be used to fetch balance details, etc.
- List transactions: This will return any on-chain transfer of assets, including outgoing settlement activity, including transfers and incoming deposits.
5. Collect trusted counterparty IDs for which you will be sending and/or receiving funds
- See "Trusted counterparties" page
- Note: Your trusted counterparties will need sot share their participant ID with you
Quorum OR authorize settlement required?
| Settlement | Initiator org | Acceptor org |
|---|---|---|
| Send | Quorum approval once initiated | Accept only |
| Receive | Quorum approval once initiated | Accept + quorum approval |
| Two-way | Quorum approval once initiated accept and quorum approve to send | Accept and quorum approve to send |
Settlement workflows
See list of Atlas workflows above.
Conditions necessary for settlement
Prior to Anchorage Digital holding and moving funds for the purposes of settlement, a few conditions must be met:
One-way settlement
- The proposer has authorized/ endorsed the proposed settlement
- The proposer has sufficient funds for the settlement amount
- The proposer has sufficient funds to cover on-chain network fees, in addition to the funds owed for the settlement
Two-way settlement
- The proposer has authorized/ endorsed the proposed settlement
- The proposer has sufficient funds for the settlement amount
- The proposer has sufficient funds to cover on-chain network fees, in addition to the funds owed for the settlement
- The acceptor has accepted and authorized/ endorsed the proposed settlement
- The acceptor has sufficient funds for the settlement amount
- The acceptor has sufficient funds to cover on-chain network fees, in addition to the funds owed for the settlement
1) One-way settle (send funds)
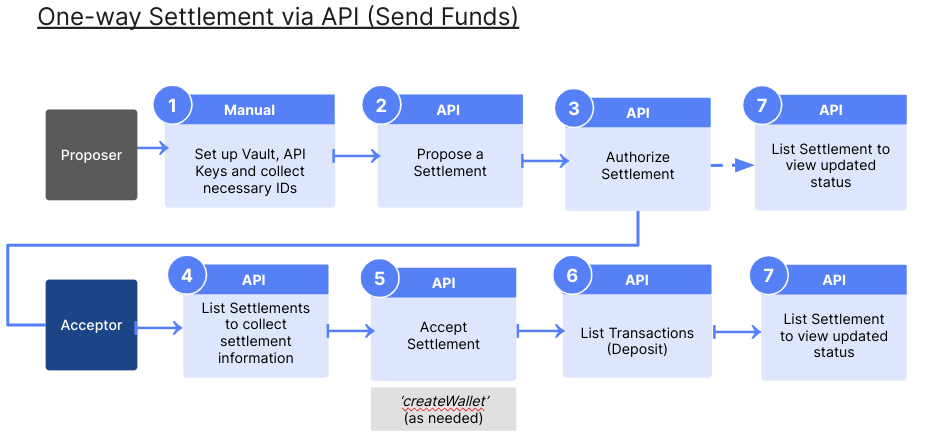
- (Proposer) Configure your participant vault details and and collect the necessary necessary recipient
participantIdneeded for transfer of assets - (Proposer) Propose a settlement (or web dashboard)
- The numeric value of this amount, excluding units. Use positive numbers for receiving and negative for sending assets. Amounts never include fees.
- (Proposer) Authorize settlement (or web dashboard)
- (Acceptor) Monitor List settlements to be notified when new settlement action is pending
- (Acceptor) Accept settlement (or web dashboard)
- Select vault and wallet IDs for your side of the settlement (sending and receiving)
- The numeric value of this amount, excluding units. Use positive numbers for receiving and negative for sending assets. Amounts never include fees.
- Invert the amounts seen in the list settlements response when submitting the accept settlement payload
- The set of wallets to use for the requested
walletAmounts. The assets must match exactly the list of assets in the proposal and the amounts must be exactly opposite the amounts in the proposal. Use positive numbers to describe assets to receive and negative to send. The sum of the amounts, by asset type, must match the negative of the sum of the amounts on the proposer's side of the settlement. - The special string
createWalletcan be used to indicate that a new wallet should be created for this asset for this settlement.
- (Acceptor) Receive funds into default vault wallets
- List transactions (Type = Deposit)
- (Proposer and acceptor) List ettlements
2) One-way settle (receive funds)
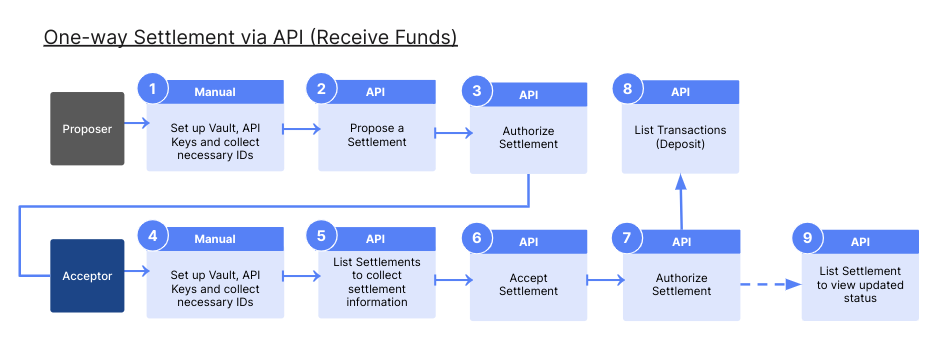
- (Proposer) Configure your participant vault details and and collect the necessary necessary recipient
participantIdneeded for transfer of assets - (Proposer) Propose a settlement (or web dashboard)
- The numeric value of this amount, excluding units. Use positive numbers for receiving and negative for sending assets. Amounts never include fees.
- (Proposer) Authorize settlement (or web dashboard)
- (Acceptor) Configure your participant vault details and and collect the necessary necessary recipient
participantIdneeded for transfer of assets - (Acceptor) Monitor List settlements to be notified when new settlement action is pending
- (Acceptor) Accept Settlement (or web dashboard)
- Select vault and wallet IDs for your side of the settlement (sending and receiving)
- The numeric value of this amount, excluding units. Use positive numbers for receiving and negative for sending assets. Amounts never include fees.
- Invert the amounts seen in the list dettlements response when submitting the accept settlement payload
- The set of wallets to use for the requested
walletAmounts. The assets must match exactly the list of assets in the proposal and the amounts must be exactly opposite the amounts in the proposal. Use positive numbers to describe assets to receive and negative to send. The sum of the amounts, by asset type, must match the negative of the sum of the amounts on the proposer's side of the settlement. - The special string
createWalletcan be used to indicate that a new wallet should be created for this asset for this settlement.
- (Acceptor) Authorize settlement (or web dashboard)
- Settlement transfer initiated at this time (assuming all settlement criteria are satisfied)
- (Proposer) Receive funds into default vault wallets
- List Transactions (Type = deposit)
- (Proposer and acceptor) List settlements
3) Two-way settle (Send and receive funds)
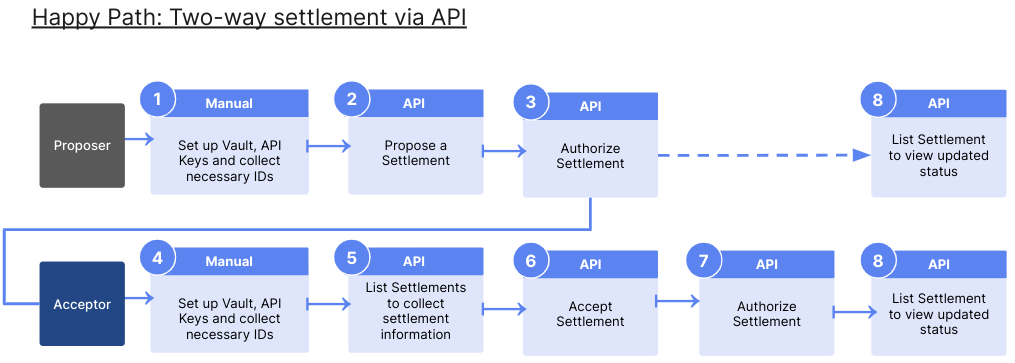
Two-way settlement criteriaIn order for a two-way settlement to occur, the following conditions must be met
- Proposer has authorized the settlement
- Acceptor has accepted the settlement
- Acceptor has authorized the settlement
- Both proposer and acceptor have fully funded all legs of the settlement (including network fees)
- (Proposer) Configure your participant vault details and and collect the necessary necessary recipient
participantIdneeded for transfer of assets - (Proposer) Propose a settlement (or web dashboard)
- The numeric value of this amount, excluding units. Use positive numbers for receiving and negative for sending assets. Amounts never include fees.
- (Proposer) Authorize settlement (or web dashboard)
- (Acceptor) Configure your participant vault details and and collect the necessary necessary recipient
participantIdneeded for transfer of assets - (Acceptor) Monitor List settlements to be notified when new settlement action is pending
- (Acceptor) Accept settlement (or web dashboard)
- Select vault and wallet IDs for your side of the settlement (sending and receiving)
- The numeric value of this amount, excluding units. Use positive numbers for receiving and negative for sending assets. Amounts never include fees.
- Invert the amounts seen in the list settlements response when submitting the accept settlement payload
- The set of wallets to use for the requested
walletAmounts. The assets must match exactly the list of assets in the proposal and the amounts must be exactly opposite the amounts in the proposal. Use positive numbers to describe assets to receive and negative to send. The sum of the amounts, by asset type, must match the negative of the sum of the amounts on the proposer's side of the settlement. - The special string
createWalletcan be used to indicate that a new wallet should be created for this asset for this settlement.
- (Acceptor) Authorize settlement (or web dashboard)
- Settlement transfer initiated at this time (assuming all settlement criteria are satisfied)
- (Proposer) Receive funds into default vault wallets
- List transactions (Type = Deposit)
- (Proposer and Acceptor) List settlements
Changelog
Please subscribe to our changelog for detailed updates across all Anchorage Digital APIs.
Updated 6 months ago